


I’ll admit, I love wrapping presents on Christmas Eve while watching something festive—to a point. I have 4 kids, 2 adults, plus myriad relatives to wrap presents for, and eventually I get tired of wrapping them all (usually by 11 pm I’m growing weary).
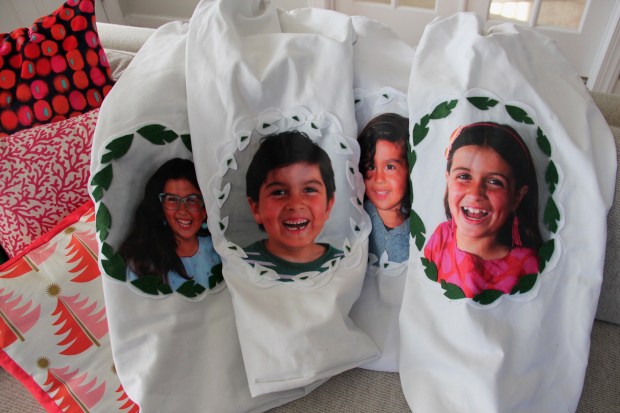
I remember seeing this concept years ago– bags you put all the presents in– and thinking that surely this took the fun out of it all. Who doesn’t love the act of ripping open the gifts? But I had these left-over portraits of my kids faces from when I made these embroidered pieces in August— just sitting in my closet. I’d been trying to figure out what to do with them when the idea struck.
REASONS THESE BAGS (are going to) ROCK:
*Besides taking forever to wrap all those gifts, it’s so much waste! It kills me seeing that giant mountain of wrapping paper trash every year.
*Oddly-shaped gifts? Just throw them in the bag!
*Sometimes the kids come down and try to open gifts before we get there, and open each other’s stuff… its hard to explain why I happen to know “Santa probably didn’t intend that for you even though it was near your stocking honey!” There will be NO questions when Santa has put the presents in the bag with the kid’s face!
*I CAN still wrap some gifts– My plan is to wrap all the gifts from mommy and daddy, and have “Santa” just throw his in the bag!
*I can reuse these, and spend less on gift wrap over the years. We move around a lot (military), including overseas, and we won’t have to cart around or store all the wrapping supplies.
These aren’t hard to make, and basically if you can sew a straight line, you can make them. I’m going to show you how!

Supplies Needed:
*1 yard of Canvas, or sturdy fabric per bag (you need a wide 57″-60″ wide fabric).
*Grosgrain Ribbon, Twill, Jute, etc for drawstring (I cut mine double the width of the finished bag.)
*White Felt (enough for each portrait), Green (or other color) felt for details, hot glue, and scissors
*Printed Portraits: I printed my kid’s faces on Fat Quarters at Spoonflower but you can also use the “Fill-a Yard” option and print them all on one yard. Read more about this in my original portrait post HERE.

TUTORIAL:
- Cut the portraits out in an oval shape.
- Hot glue them to white felt and cut out with a decorative scalloped edge (or wavy, spiky, etc).
- Cut little leaf shapes out of the contrasting felt and place them on each scallop, covering the raw edges of the fabric portraits. Hot glue them to down.

4. Open up the yard of canvas and find the middle. Mine had a crease in it, so I didn’t need to mark it! Place the portrait on the fabric near the middle or middle/bottom of one side. Pin down and sew to the canvas through the felt part of the portrait.
5. Fold the canvas in half– lengthwise– RST and sew the side and bottom of the bag. Finish the seams.

6. On the top edge (opening of the bag), you can finish the seam, or leave raw (I finished mine with the serger).
7. Make two buttons holes, or attach 2 grommets (follow instructions on grommet package) for the drawstring.

8. Fold the top edge of the bag OUTWARD (making the drawstring casing on the outside) 1.5″ and press. As you pin it down, fold the raw edge under 1/4″ so it is enclosed.

9. Sew the entire circumference at 1/16″ (right next to the edge). You don’t have to leave an opening to thread the drawstring, because you have the holes!
10. Using a safety pin or other tool, thread your drawstring through the bag and you’re DONE!

These bags can be stored away or placed under the tree waiting to be filled on Christmas Day! My kids are so excited about them! And I’m excited that this will make one aspect of holiday prep MUCH easier and quicker!
**This project takes approximately 1 hour per bag (or less!) So its an easy last minute project! Just get those fabric portraits ordered ASAP!